Cymbal repair guide

In life of every drummer there is a moment when their precious cymbals cracks. When this happens you feel like your world just fell apart, and you immediately start thinking about costs it will take to replace the cymbal. Because cymbals are so expensive there is never the right time to buy them. So what to do now? Repair it!
When dealing with any cymbal crack, is that if you continue to play the cymbal – the crack will get bigger. If you want to prevent that, you must act fast or it will ruin your cymbal completely. That is why it is so important to spot cracks early. The smaller the crack, the less work it will require to remove it.
With quality cymbals, right method and execution, you can get pretty good final result. On the other hand, with low-end cymbals the sound will go from acceptable to awful or even horrible. Sometimes the final effect is outstanding and you can end up with completely new sound to add to your kit.
Some ways of „fixing” a cymbal you might have heard of are: drilling holes, cutting, soldering or using an epoxy. None is ideal, but some are better than other. On to the methods!
Disclaimer:
Methods shown here are for informational purposes only. All of them are unreversible. If you use any of them you do so on your own risk! If you are inexperienced in use of any tool discussed here, consult and ask for help people with proper experience. Wear protective gloves and eye protection. Read the manuals before using power tools or epoxy. Remember – safety above all else. Hereby you acknowledge that you do not make any claims towards me, based on the use of information shown in this article.

Epoxy
Probably the easiest, and least invasive is using an epoxy to seal the crack. This is acceptable if you are not a hard hitter, and you plan to buy a replacement soon. Unfortunately the epoxy is not going to last long because of very small contact area.
How to apply: Set up a cymbal stand, and mount the cracked cymbal (if it is not mounted), so it can hang flat. Adjust the height so it is against your stomach for easy access. Mix the epoxy and push it into a crack. Wipe the excess with soft cloth. Then hit a cymbal with your drumstick (not too hard!), and let it vibrate. The epoxy will move further into the crack. Then repeat the process until your are satisfied (two to three times total should do the trick). Do not play the cymbal for a few days.
Some people claim that after applying the epoxy you should heat it to strenghten it (using oven for example), but I would not recommend that. You will destroy the cymbal coating and soften the alloy. This will waste the cymbal sound and bring new cracks very soon. Always use an epoxy that does not require high temperatures to harden.
Drilling holes
One of the better methods to fight cracks in cymbals. Unfortunately it is not so easy to apply as one could think. Obviously you need a drill motor and some kind of vice to hold the cymbal (watch out to not bend it!). If you do not have the experience with handling the drill, better ask someone experienced for help.
Mark the place you want to drill with marker. Make the mark not where the crack ends, but a little higher (depends on the diameter of used bit). The hardest part is to hold drill steady when drilling, because it can slip very easily around your cymbal and damage the coating. You may need to use considerable force to make the drill through. Remember to turn off the hammer and use bits suitable for metal before you start.
Making a cut
In my opinion the best method to carry out a cymbal repair. Great about it is that cymbal can get second life after successful application. Cutting a cymbal properly is pretty easy to carry out, but requires some patience.
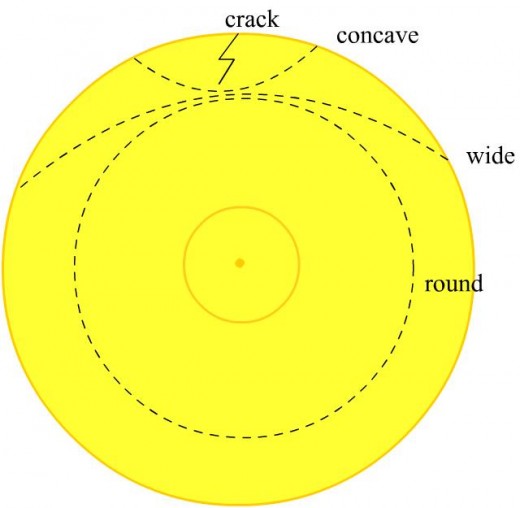
Most important part is the plan for the cut. How you should cut your cymbal is mostly affected by the size of the crack. If the crack is small you can do what I call a „concave cut” (see the picture). If the crack is bigger, turns or splits you should do a wide cut or round cut instead.
Use marker to draw a curve around the crack in the manner shown in the picture. Leave around half inch of space between crack and planned cut. The wider the cut, the better for the cymbal durability.
For a concave cut you will need a fretsaw or coping saw equipped with metal cutting blade. For less curvy cuts I used just a wider blade without handle and results were outstanding. Take your time when cutting, make it precise. When the cut is made, use file and sandpaper to smooth out the edge. You are done!
Note: I DO NOT recommend using any electric or gas powered saws. They generate high temperature very fast and can do more harm than good to your cymbal.


